Today, I’m going to show you the outdoor mount that I got that I’m going to use for my Yi 1080p Home camera. I did a quick review on this camera last week.
So, I got this outdoor mount from Amazon and it is designed for the Nest Cam or Drop cam. The Yi and the nestcam are almost identical except that the Nestcam is thicker from front to back. So, I will need a little hack to position my Yi camera right on the mount and I’ll show it to you later on.
This case is manufactured by dropcases and is on a flexible goose neck so that you can position the camera at any angle. It comes with its own micro USB cable. Unscrewing the case you will see the metal base here that is used as a heat sink and a plastic cap with a black ring on it to prevent IR glare at night. It comes with its own micro USB cable that is basically customized for this case as you can see that it has a pretty tight bend and it seats on this cutout. The locking ring is plastic and the cable is pretty long with a micro to regular USB adapter at the end so that you can just plug it in on the power brick. With the goose neck, you can adjust the camera at any angle.
This case is waterproof and is IP66 certified and has been tested up to 20 mins fully submerged in water. I’m going to install this 12 feet up in the ceiling so hopefully it is not going to be submerged. I bought this mostly to protect my Yi camera from humidity, dust and corrosion.
Now, we just need to pop off the main camera from the mount by applying pressure backwards until the camera pops off.
I then need to plug it in on the cable which the easy way is to pull the cable out and plug it in.Then we will set it back on the notch. If you screw in the cap, you will notice that the Yi camera is loose inside the case. This is because the Yi camera is thinner than the nest camera which this case is designed for. So, this is where we are going to improvise and use our lifehack skills. As we know that the metal base acts as a heat sink and the best way for us to add thickness on our camera is the material that we need to add needs to be a metal or conductor also.
The best material for this is a good ol aluminum foil. Just cut a strip around a legal size paper length and fold it until it is the size or smaller than the back of the case. Foil is good for this because you can just add more if you need it thicker and cut off if it is too much.
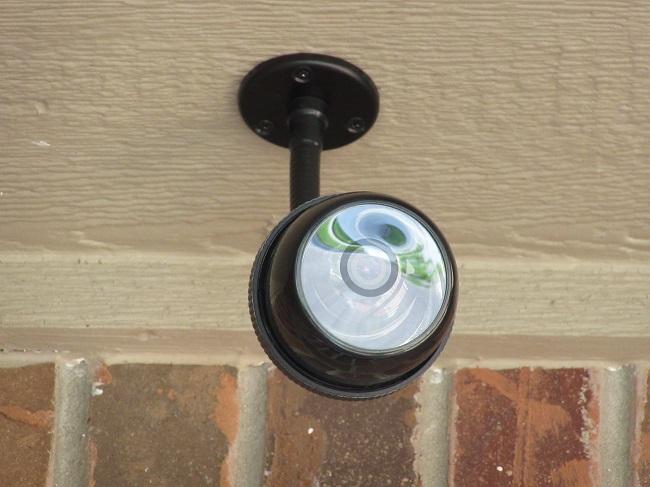
We just need to place the folded foil on the back like so. The goal is the lens of the Yi camera needs to be tightly pressed on the glass and inside the black painted circle. This is where you will need to maneuver and get everything right. The thicker you have the foil the better because it will have a give and the lens need to be pressed good on the glass so that it will not move around and also will prevent the infrared glare on the camera when in night vision mode. A lot of people complained on outdoor cases for these cameras because mostly of the infrared glare that makes the video feed useless at night. So, as long as the lens is inside the black circle and tightly press on the glass, you will not have this issue. When it is fitted snug, the camera will not move around when you shake it.
Now my plan is to install this camera outside my front door overlooking the sidewalk so that I can see the cars and people before they actually get to my door. This camera will compliment my Ring doorbell camera. I’ll install it right around the brown spot which is actually caulk that I used to cover the hole from another camera I used before.
First, I’m going to mark the areas where I will screw in the base. I’ll drill the hole in the middle of it for the micro USB cable. Make sure the hole is big enough for the cable plug to go through. I’ll then feed the cable through the hole going into the attic where I have an extension cord and an electrical outlet where I can plug in the camera.
Then we need to screw in the outdoor case with 3 screws that are included. And there you have it. It is now installed and with a flexible shaft, you basically can point and adjust the camera in any direction.
You can barely see the camera and it is around 12 feet high up in the ceiling. If you feed the power cable through the attic, then as you can see it is a clean install with no wires sticking outside. I have an electrical outlet in the attic where I plugged the camera in.
It is time for some video footage. Here are some daytime video feeds and I setup the camera to only record when it senses motion.
Now, this is night time with night vision on. As you can see as long as you have the Yi camera lens set up right then you will not have a glare like other people that have been complaining about this camera case.
Outdoor Case designed for Nestcam / Drop Cam